

 一只兔
一只兔 832 字
4 分钟
每日微信推送天气
2025-09-21

微信推送天气
1、申请公众号测试用户
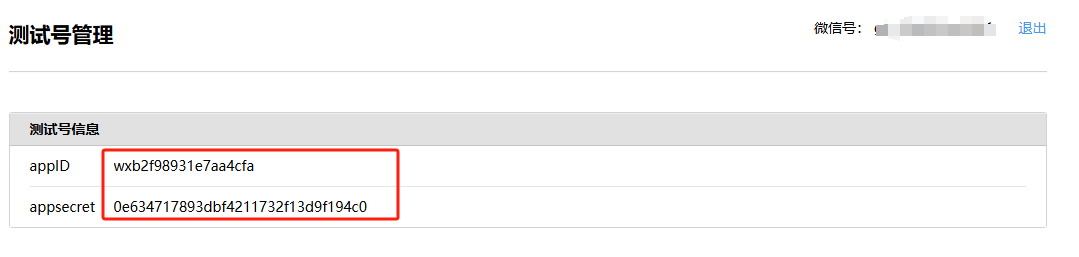
使用微信扫码即可:https://mp.weixin.qq.com/debug/cgi-bin/sandbox?t=sandbox/login2、进入页面以后我们来获取到这四个值
1、appID和appSecret
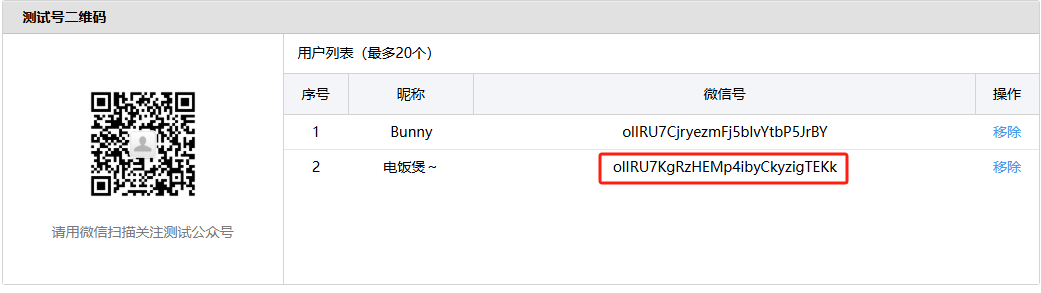
2、想让谁收消息,谁就用微信扫二维码,然后出现在用户列表,获取微信号(openId)
3、新增测试模板获得 template_id(模板ID)
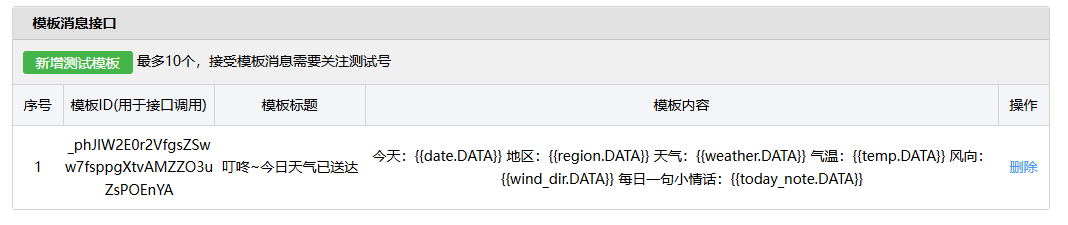
模板标题随便填,模板内容如下,可以根据需求自己定制
模板内容:
今天:{{date.DATA}}地区:{{region.DATA}}天气:{{weather.DATA}}气温:{{temp.DATA}}风向:{{wind_dir.DATA}}每日一句小情话:{{today_note.DATA}}3、项目配置
# weather_report.py代码如下# 安装依赖 pip3 install requests html5lib bs4 scheduleimport osimport requestsimport jsonfrom bs4 import BeautifulSoup
# 从测试号信息获取appID = os.environ.get("APP_ID")appSecret = os.environ.get("APP_SECRET")# 收信人ID即 用户列表中的微信号openId = os.environ.get("OPEN_ID")# 天气预报模板IDweather_template_id = os.environ.get("TEMPLATE_ID")
def get_weather(my_city): urls = ["http://www.weather.com.cn/textFC/hb.shtml", "http://www.weather.com.cn/textFC/db.shtml", "http://www.weather.com.cn/textFC/hd.shtml", "http://www.weather.com.cn/textFC/hz.shtml", "http://www.weather.com.cn/textFC/hn.shtml", "http://www.weather.com.cn/textFC/xb.shtml", "http://www.weather.com.cn/textFC/xn.shtml" ] for url in urls: resp = requests.get(url) text = resp.content.decode("utf-8") soup = BeautifulSoup(text, 'html5lib') div_conMidtab = soup.find("div", class_="conMidtab") tables = div_conMidtab.find_all("table") for table in tables: trs = table.find_all("tr")[2:] for index, tr in enumerate(trs): tds = tr.find_all("td") # 这里倒着数,因为每个省会的td结构跟其他不一样 city_td = tds[-8] this_city = list(city_td.stripped_strings)[0] if this_city == my_city:
high_temp_td = tds[-5] low_temp_td = tds[-2] weather_type_day_td = tds[-7] weather_type_night_td = tds[-4] wind_td_day = tds[-6] wind_td_day_night = tds[-3]
high_temp = list(high_temp_td.stripped_strings)[0] low_temp = list(low_temp_td.stripped_strings)[0] weather_typ_day = list(weather_type_day_td.stripped_strings)[0] weather_type_night = list(weather_type_night_td.stripped_strings)[0]
wind_day = list(wind_td_day.stripped_strings)[0] + list(wind_td_day.stripped_strings)[1] wind_night = list(wind_td_day_night.stripped_strings)[0] + list(wind_td_day_night.stripped_strings)[1]
# 如果没有白天的数据就使用夜间的 temp = f"{low_temp}——{high_temp}摄氏度" if high_temp != "-" else f"{low_temp}摄氏度" weather_typ = weather_typ_day if weather_typ_day != "-" else weather_type_night wind = f"{wind_day}" if wind_day != "--" else f"{wind_night}" return this_city, temp, weather_typ, wind
def get_access_token(): # 获取access token的url url = 'https://api.weixin.qq.com/cgi-bin/token?grant_type=client_credential&appid={}&secret={}' \ .format(appID.strip(), appSecret.strip()) response = requests.get(url).json() print(response) access_token = response.get('access_token') return access_token
def get_daily_love(): # 每日一句情话 url = "https://api.lovelive.tools/api/SweetNothings/Serialization/Json" r = requests.get(url) all_dict = json.loads(r.text) sentence = all_dict['returnObj'][0] daily_love = sentence return daily_love
def send_weather(access_token, weather): # touser 就是 openID # template_id 就是模板ID # url 就是点击模板跳转的url # data就按这种格式写,time和text就是之前{{time.DATA}}中的那个time,value就是你要替换DATA的值
import datetime today = datetime.date.today() today_str = today.strftime("%Y年%m月%d日")
body = { "touser": openId.strip(), "template_id": weather_template_id.strip(), "url": "https://weixin.qq.com", "data": { "date": { "value": today_str }, "region": { "value": weather[0] }, "weather": { "value": weather[2] }, "temp": { "value": weather[1] }, "wind_dir": { "value": weather[3] }, "today_note": { "value": get_daily_love() } } } url = 'https://api.weixin.qq.com/cgi-bin/message/template/send?access_token={}'.format(access_token) print(requests.post(url, json.dumps(body)).text)
def weather_report(this_city): # 1.获取access_token access_token = get_access_token() # 2. 获取天气 weather = get_weather(this_city) print(f"天气信息: {weather}") # 3. 发送消息 send_weather(access_token, weather)
if __name__ == '__main__': # 替换成自己的城市 weather_report("宿州")# weather_report.yml代码如下# This workflow will install Python dependencies, run tests and lint with a single version of Python
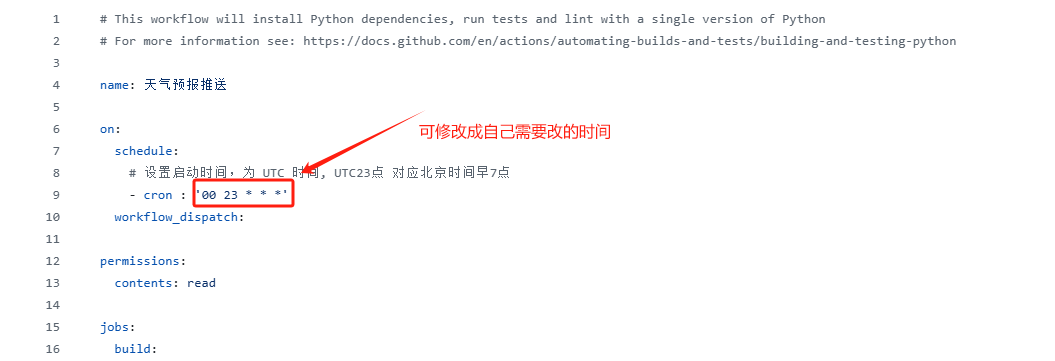
name: 天气预报推送
on: schedule: # 设置启动时间,为 UTC 时间, UTC23点 对应北京时间早7点 - cron : '00 23 * * *' workflow_dispatch:
permissions: contents: read
jobs: build:
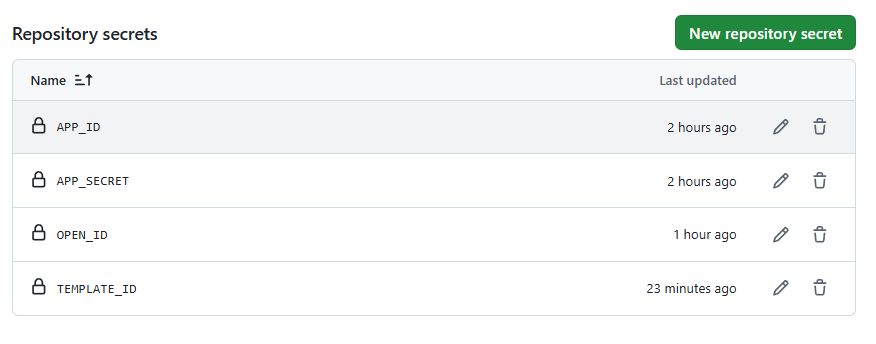
runs-on: ubuntu-latest env: TZ: Asia/Shanghai steps: - uses: actions/checkout@v3 - name: Set up Python 3.12 uses: actions/setup-python@v3 with: python-version: "3.12" - name: Install dependencies run: | python -m pip install --upgrade pip if [ -f requirements.txt ]; then pip install -r requirements.txt; fi - name: Run weather Report run: | python weather_report.py env: APP_ID: ${{ secrets.APP_ID }} APP_SECRET: ${{ secrets.APP_SECRET }} OPEN_ID: ${{ secrets.OPEN_ID }} TEMPLATE_ID: ${{ secrets.TEMPLATE_ID }}(1)将上述两个代码推送到Github上后,进入自己项目的Settings ----> Secrets and variables ---> Actions —> New repository secret 配置好以下四个值(见下文)
(2)进入自己项目的Action ----> 天气预报推送 ---> weather_report.yml —> 修改cron表达式的执行时间
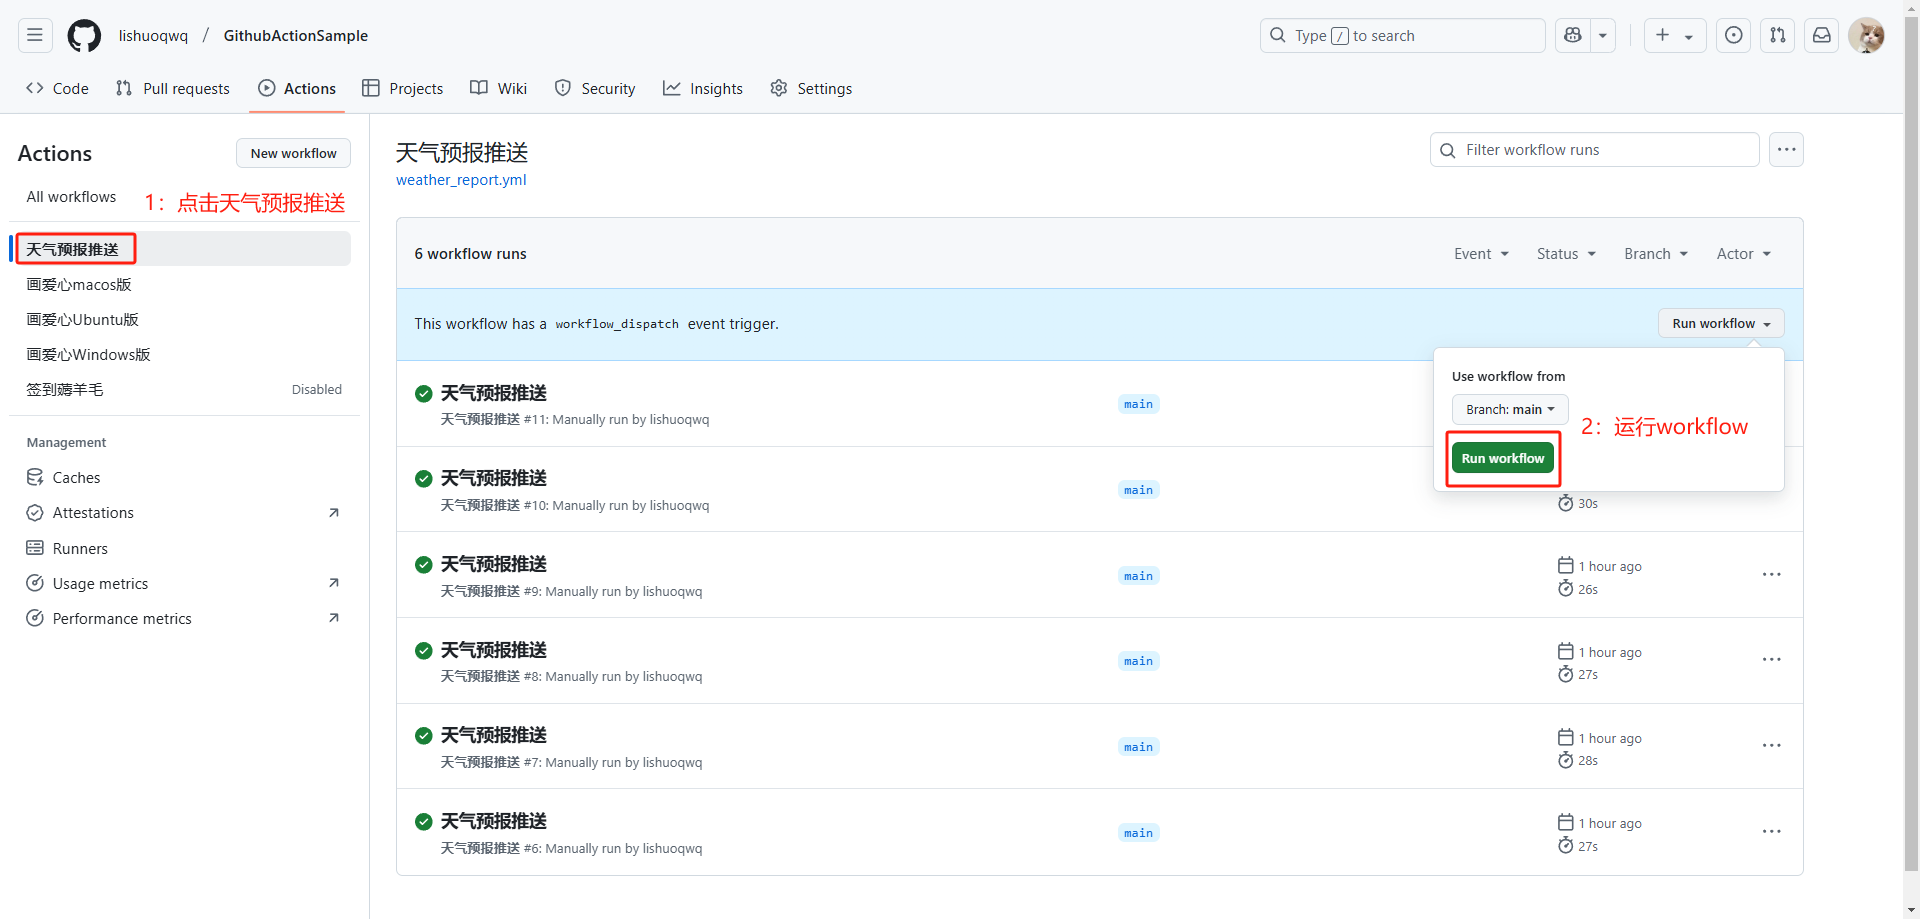
(3)测试运行Flowable工作流是否可以正常使用,推送消息是否可达
文章分享
如果这篇文章对你有帮助,欢迎分享给更多人!
最后更新于 2025-09-21,距今已过 188 天
部分内容可能已过时